Analytics Conversion Funnel - Ajax & Google Tag Manager 

Tutorial: Set up Universal Analytics Funnel for Ajax websites using Google Tag Manager

Analytics Conversion Funnel

From a user’s and web developer’s perspective, the use of Ajax brings many advantages. The fact that not the entire page, but only the necessary data needs to be exchanged between the server and the user agent results in a significant increase in speed and less traffic consumption for the website operator.

Ajax and web tracking

The use of Ajax can complicate web analytics.

For advertisers, the use of Ajax often poses a significant problem for web analytics. While it was previously possible to simply define a goal and the conversion funnel steps in physical pages in Google Analytics, this is no longer straightforward today. In an Ajax checkout process, the URL often does not change, and for example, the entire payment process takes place on the page, e.g. /order, without being able to specifically track a certain target page or an intermediate step. In the following article, we describe how to visualize the analytics conversion funnel despite Ajax using Google Tag Manager and virtual page views.

Virtual URLs and DataLayers

The solution: Implementation of virtual URLs and data layer variables

In this example, we implement a conversion funnel over 5 steps. It is best to think about it before starting, which “virtual URLs” (virtualPageURL) should be used (how many steps you want to track) and what these pages should be called (virtualPageTitle). This information is then passed to a specific event in the Google Tag Manager using a data layer variable (DataLayer) (more on that shortly).

You do not necessarily have to use a virtualPageTitle. However, it is advisable, as the URL and Title are displayed as primary dimensions in Analytics!

Naming of the funnel steps

1

1. Shopping Cart

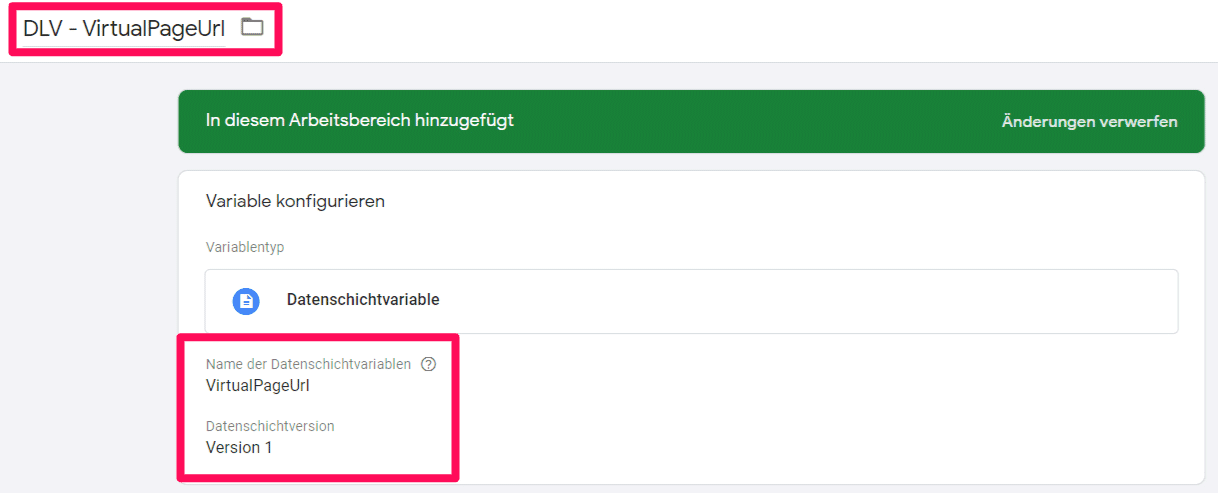
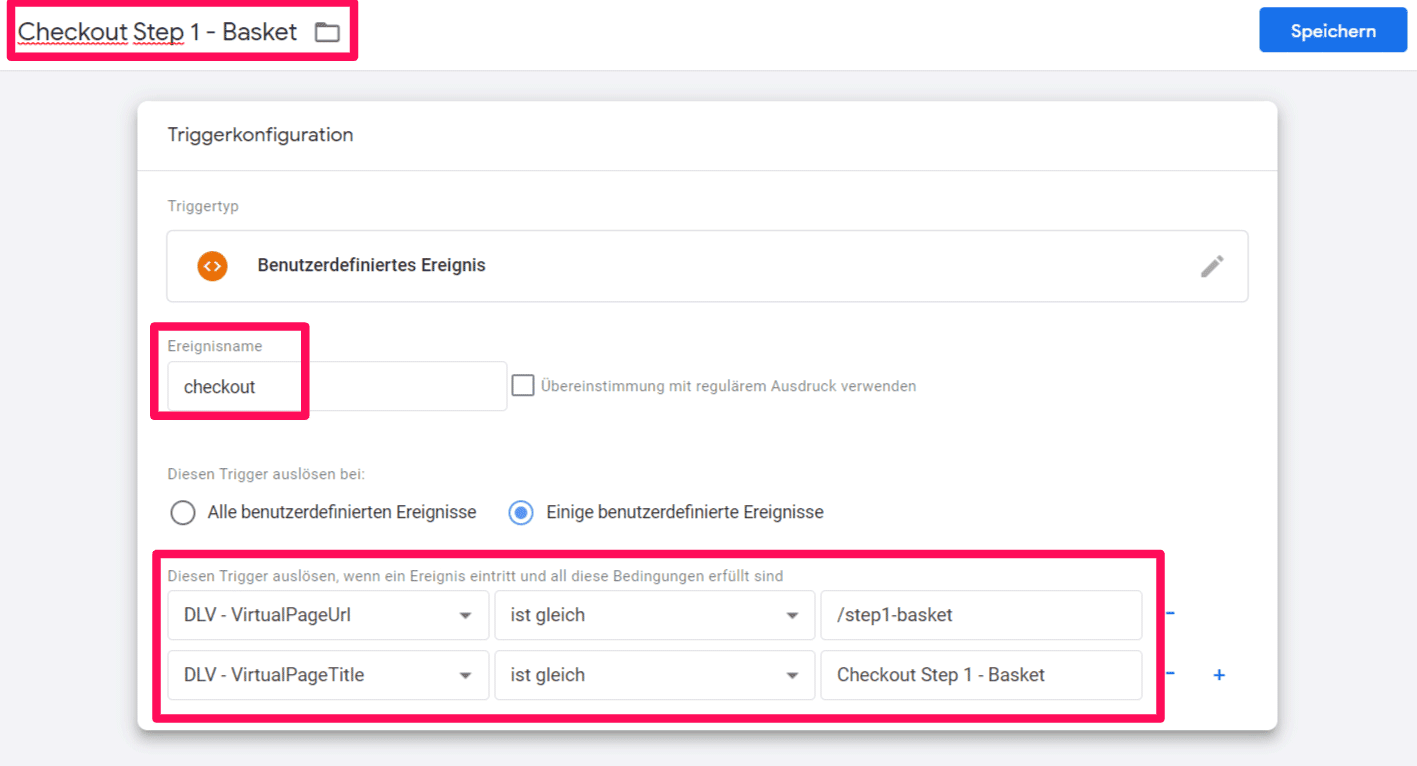
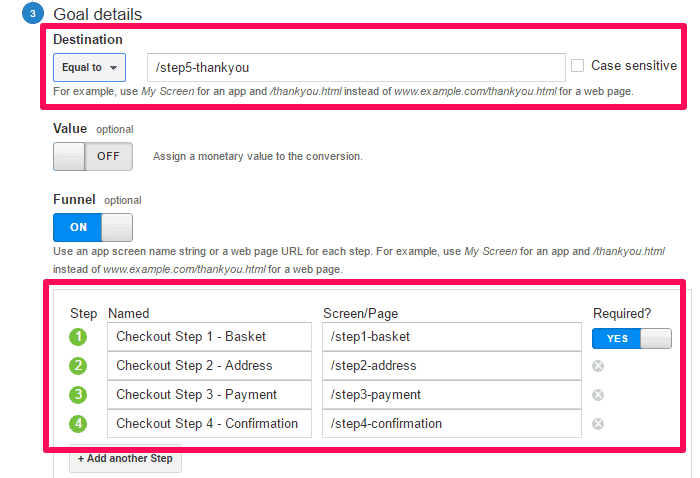
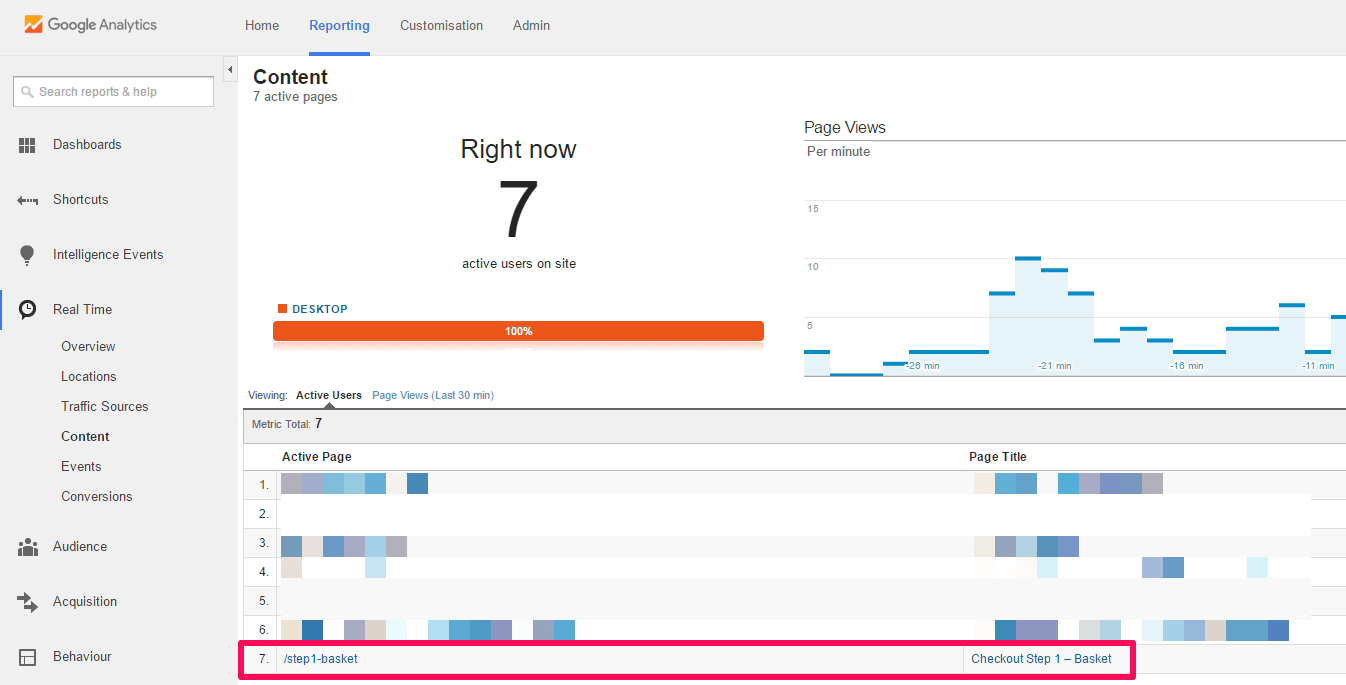
virtualPageURL‘:’/step1-basketrnvirtualPageTitle‘ : ‚Checkout Step 1 – Basket

2

2. Address entry

virtualPageURL‘:’/step2-addressrnvirtualPageTitle‘ : ‚Checkout Step 2 – Address

3

3. Payment information

virtualPageURL‘:’/step3-paymentrnvirtualPageTitle‘ : ‚Checkout Step 3 – Payment

4

4. Examination

virtualPageURL‘:’/step4-confirmation
virtualPageTitle‘ : ‚Checkout Step 4 – Confirmation

5

5. Confirmation page

virtualPageURL‘:’/step5-thankyou
virtualPageTitle‘ : ‚Checkout Step 5 – Thank you

Implementation on the website

Integrate DataLayer / data layer variable on the website

For the implementation of the DataLayer, you must have access to the source code of the website. At the beginning, it is necessary to declare an empty DataLayer before the first step of the funnel process (in our example, the shopping cart). This serves as a basis and will be filled with data at runtime.

For each step in the Analytics Conversion Funnel process, the DataLayer must now be populated with specific information using a dataLayer.push command; here is a brief explanation of what the following JavaScript means.

  1. dataLayer.push – This statement passes information to the data layer variable.
  2. event – This variable represents a specific event for which an action is to be triggered. In our example, we named the event “Checkout”.
  3. virtualPageURL – See above – Relative URL to be tracked.
  4. virtualPageTitle – See above – Page name to be tracked.

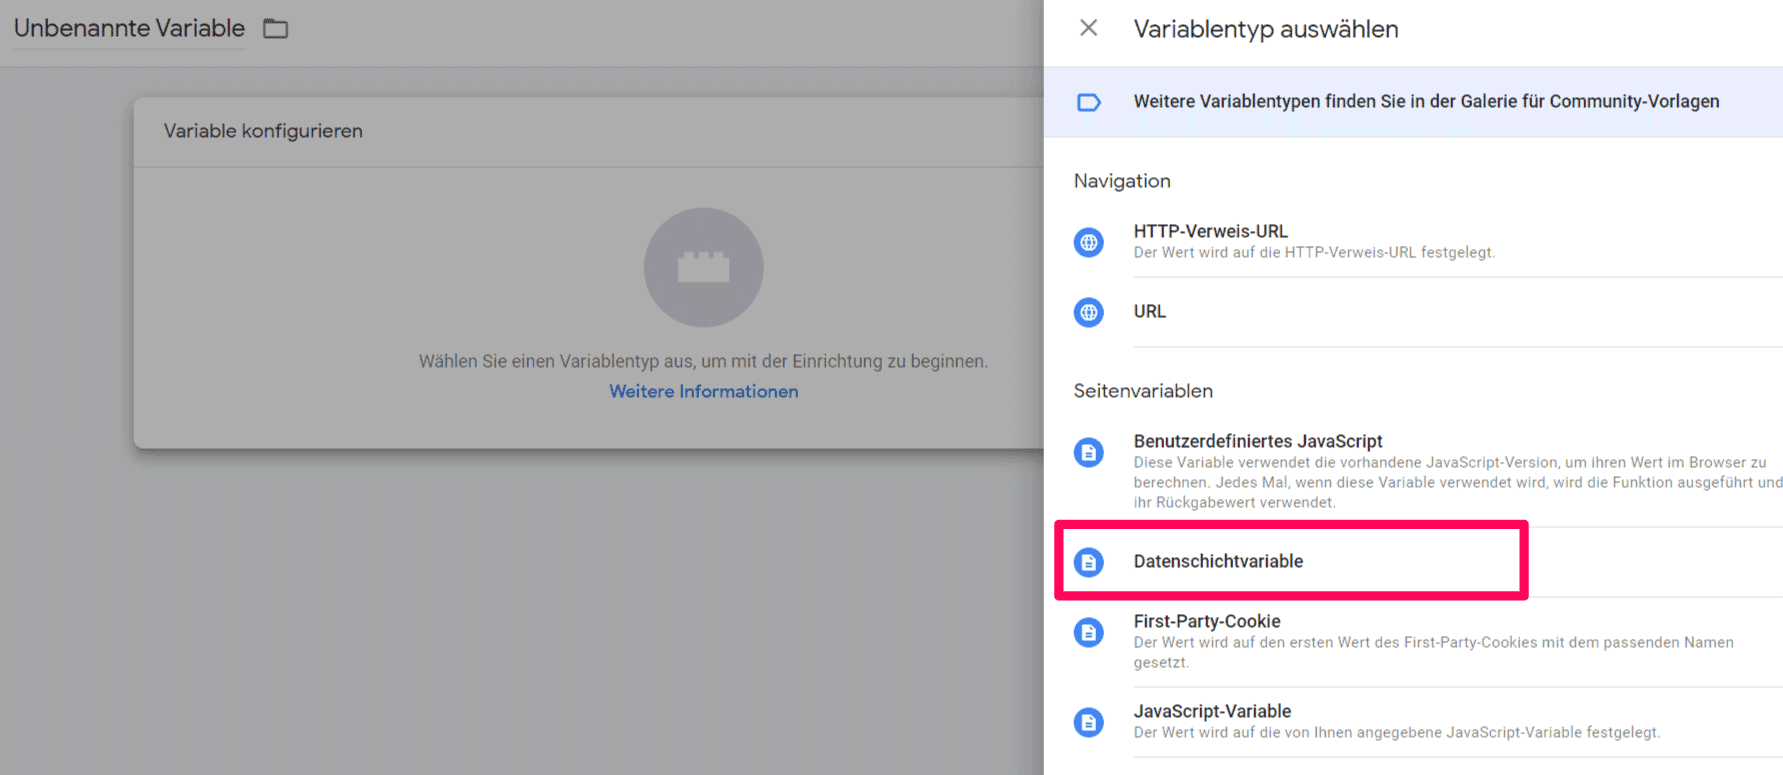
JavaScripts that you need to fill in the data layer variable accordingly at each step

Define DataLayers

1

1. dataLayer.push command for the shopping cart

1
2
3
4
5
6
7
<script type="text/javascript">
dataLayer.push({
'event':'checkout',
'virtualPageURL':'/step1-basket',
'virtualPageTitle' : 'Checkout Step 1 – Basket'
});
</script>
2

2. dataLayer.push command for address input

1
2
3
4
5
6
7
<script type="text/javascript">
dataLayer.push({
'event':'checkout',
'virtualPageURL':'/step2-address',
'virtualPageTitle' : 'Checkout Step 2 – Address'
});
</script>
3

3. dataLayer.push command for the payment data

1
2
3
4
5
6
7
<script type="text/javascript">
dataLayer.push({
'event':'checkout',
'virtualPageURL':'/step3-payment',
'virtualPageTitle' : 'Checkout Step 3 – Payment'
});
</script>
4

4. dataLayer.push command for confirmation

1
2
3
4
5
6
7
<script type="text/javascript">
dataLayer.push({
'event':'checkout',
'virtualPageURL':'/step4-confirmation',
'virtualPageTitle' : 'Checkout Step 4 – Confirmation'
});
</script>
5

5. dataLayer.push command for the "thank you page"

1
2
3
4
5
6
7
<script type="text/javascript">
dataLayer.push({
'event':'checkout',
'virtualPageURL':'/step5-thankyou',
'virtualPageTitle' : 'Checkout Step 5 – Thank you'
});
</script>

Create custom variables in the GTM backend

Create custom data layer variables to prepare tracking

First, the virtualPageURL and virtualPageTitle variables need to be defined once so that the GTM can store this information. Click on ‘Variables’ in the left side navigation and then click the ‘New’ button next to ‘Custom Variables’. In the window that opens, click ‘Configure Variable’, select ‘Data Layer Variable’, and configure it as follows.

GTM Datenschichtvariable

Configure custom data layer variables

Naming and settings of the custom data layer variables

Now choose a name for the variable, in our example it is called “DLV – VirtualPageUrl” (DLV stands for “DataLayer Variable”).

Important: The name of the data layer variable should not be confused with the name! These can be identical, but they do not have to be.

In our example, the name of the data layer variable is “virtualPageUrl“, set “data layer version” to 1. Now save the variable and repeat the process for the variable “virtualPageTitle“.

GTM Benutzerdefinierte Variable

The "Virtual PageView Trigger"

Definition of the "trigger", when an event should be fired

In the next step, the trigger must be defined, i.e., when data should be passed to the data layer variable. As mentioned above, we use the event “checkout” for this purpose. To do this, go to the Google Tag Manager backend, click on “Triggers” on the left, then click on “New” and select “Custom Event” as the trigger type.

Now name the trigger, for example, “Checkout Step 1 – Basket” as in our example. Under “Trigger this event when”, please enter our event name “checkout”. Under conditions, set “virtualPageUrl equals /step1-basket” and “virtualPageTitle equals “Checkout Step 1 – Basket”, then press “Save Trigger”.

This trigger will be active when the event “Checkout” occurs AND when the virtualPageTitle AND virtualPageUrl conditions are met.

GTM Trigger

Virtual PageView Trigger - Example for Step 2

Now repeat the step for all 5 funnel steps.

Each step of the payment process requires its own trigger, so repeat the process accordingly. A simple way is to use the “Copy” function, just adjust the title as well as virtualPageUrl and virtualPageTitle. The event trigger “checkout” does not change.

Once all events for the five steps are created, make sure that the above defined data layer variables are output by the Ajax application at the respective steps. If these are not present, tracking may not work because a) the event “Checkout” does not occur (which we need to fire the respective events) and b) VirtualPageUrl and VirtualPageTitle are also not available (these are needed for the individual funnel steps).

GTM Trigger Checkout

Google Analytics funnel event tags

Create UA events for funnel visualization

For each step in the checkout process, a corresponding analytics event must now be defined and “connected” with the respective triggers. So, click on “Tags” in the GTM backend, then “New” and select the predefined Universal Analytics tag. Add your tracking ID and select “Track Type” PageView.

Important: Check the box for “Enable overriding settings in this tag” under “More Settings” and select “Fields to Set”. Here, the predefined standard variables “page” for “virtualPageView” and “title” for “virtualPageTitle” must be used.

Finally, click on “Trigger” “Select Trigger” and choose the previously defined trigger for /step1-basket. As with the triggers, you must repeat this process for all steps in the checkout process.

GTM Funnel Tracking 1

Debugging in Google Tag Manager

Check the implementation with the "Google Tag Assistant"

The GTM Debugging Tool “Google Tag Assistant” is a convenient feature to quickly identify potential sources of errors and to get information about the current content of the data layer variables. Instead of publishing the container directly, you can use the Preview function to publish the container for testing and check the implementation. Click on “Preview” at the top right.

If you now add a product to the cart and view it, “Analytics – Goal Funnel Tracking Step 1” should be visible under “Tags fired”.

If this is not the case, you can click on the “DataLayer” tab to determine whether the information is correctly present to fire the tag.

GTM Tag Assistant

Define Analytics Conversion Funnel Steps

Finally, only the individual funnel steps need to be added to Analytics.

In the last step, we will now define the Analytics conversion funnel for a goal (e.g., sale). Click on the gear “Admin” in the bottom left of Analytics, then on the far right under “All Website Data” click on “Goals”. Here you can now create the new goal along with the funnel. As the goal achievement, as seen in the screenshot, the goal URL must be entered as the “Thank You Page” “/step5-thankyou”. Then toggle the “Funnel” switch and enter the individual funnel steps as shown in the screenshot. You can find the funnel by clicking on “Conversions” / “Goals” / “Funnel Visualization” in Analytics.

GTM Funnel Tracking 2

Funnel visualization in Analytics

Quickly and easily check with "real-time data" whether the data is coming in correctly.

If you now look at the real-time analysis, the individual steps should be visible there under “Real-time” and “Events”. To check the correct flow of data, click through the order process and observe the display of the individual steps in the real-time view at each step.

GTM Real Time

Do you have questions about Google Tag Manager and Ajax pages?

If you have questions, problems, or need a Google Tag Manager / Google Analytics implementation for Ajax pages or training, feel free to contact us!

Ein Mann in weißem Hemd lehnt an einer Wand, neben ihm das Rheinwunder Logo
Contact person:
Ralph Grundmann
0228 243 313 53
Get in touch now!
4.9
Based on 33 reviews